这次准备写一系列的关于自己学习插件化的过程了,前面虽然陆陆续续的学习了一些插件化方面的知识,但是都是淡淡续续的,这次要从基础开始了,其实我一直认为基础这个东西挺重要的。
本文代码在我的Github上面:Plugin Demo
这里首先说明一下代理模式在插件化中的作用,代理其实就是劫持一个类,然后在执行指定的方法的时候,做一些事,一些什么事情呢,比如在前面或者后面加个统计,或者直接替换原来的执行逻辑,换成自己的逻辑。
其他比如,我们需要在不同的情况下返回同一个方法的不同实现也可以使用代理模式的,比如在做Push的时候,我们可能在App里面不止使用了一个推送服务,比如很多App会同时集成,个推和小米以及华为的推送,那么我们需要在不同的手机上面使用不同的推送,小米和和华为手机上面使用他们自己的,其余的手机上面使用个推的。那这个时候就可以使用代理模式来实现,因为推送基本就那几个方法,一是开启推送,一是给设备打标签等等方法需要我们实现。那分别用几个实现类实现即可,好吧,其实这个是策略模式,逃。
我们时常会看到别人说hook,特别是在插件化的时候,hook住Activity的启动,通过预先埋在Manifest里面的Activity,替换成我们真正想要启动的Activity等等的说法。通常Hook,又叫钩子,通常是指对一些方法进行拦截。这样当这些方法被调用时,也能够执行我们自己的代码,这也是面向切面编程的思想(AOP )。插件化知识详细分解及原理 之代理,hook,反射 ,感觉说的挺好。这里是不是就能感受到代理模式的强大了,下面会细说的。
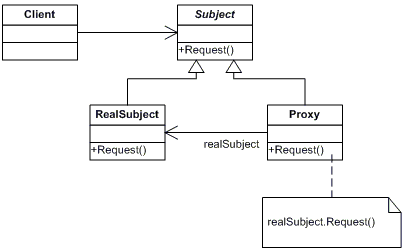
代理模式的意思就是为其他对象提供一种代理以控制对这个对象的访问,一般当我们无法或者不想直接访问某个对象或者访问某个对象存在困难时,可以用过一个代理对象来间接访问。(下图出自:代理模式及Java实现动态代理 )cglib 提供的代理类,他们的区别是:JDK动态代理只能对实现了接口的类生成代理,而不能针对类 。 这里需要注意,因为是代理模式,肯定是需要真正代理某个类的,也就是说需要真正做事得类,然后对这个类进行代理。这点是基础,不然说不定你会越看越懵逼。
普通代理 假设这样一个例子,小明要做某件事(自行脑补什么事),他不想自己做,想委托给别人做,那么这个代理怎么写呢。
1
2
3
public interface IDoThing void doSomeThing () }
然后需要真正做事的类,小明,就像上面说的,这个是基础,这个都没有,代理个毛。
1
2
3
4
5
6
public class Xiaoming implements IDoThing @Override public void doSomeThing () System.out.println("xiaoming doSomething()" ); } }
然后是代理类的实现:
1
2
3
4
5
6
7
8
9
10
public class ProxyXiaoming implements IDoThing private IDoThing mSubject; public ProxyXiaoming (IDoThing subject) mSubject = subject; } @Override public void doSomeThing () mSubject.doSomeThing(); } }
最后是调用的时候啦:
1
2
3
4
5
6
7
8
9
10
public class ProxyMain public static void main (String[] params) Xiaoming real = new Xiaoming(); ProxyXiaoming proxy = new ProxyXiaoming(real); proxy.doSomeThing(); } }
JDK动态代理 先说实现,然后细说一下。
1
2
3
4
5
6
7
8
9
10
11
12
13
14
15
16
17
18
19
20
21
22
23
24
25
26
27
28
public class InvocationProxy implements InvocationHandler private Object target; public Object bind (Object target) this .target = target; return Proxy.newProxyInstance(target.getClass().getClassLoader(), target.getClass().getInterfaces(), this ); } @Override public Object invoke (Object proxy, Method method, Object[] args) throws Throwable if (target == null ) return null ; Object result; System.out.println("事物开始" ); result = method.invoke(target, args); System.out.println("事物结束" ); return result; } }
1
2
3
4
5
6
7
8
9
10
11
12
13
14
15
16
17
18
19
20
21
22
23
24
25
26
public class InvocationMain public static void main (String[] params) final Xiaoming real = new Xiaoming(); IDoThing doThing = (IDoThing) Proxy.newProxyInstance( real.getClass().getClassLoader(), new Class[]{IDoThing.class}, new InvocationHandler() { @Override public Object invoke (Object proxy, Method method, Object[] args) throws Throwable Object object = method.invoke(real, args); return object; } }); doThing.doSomeThing(); } }
JDK实现动态代理主要涉及以下几个类:java.lang.reflect.Proxy:这是生成代理类的主类,通过 Proxy 类生成的代理类都继承了 Proxy 类。java.lang.reflect.InvocationHandler: 这里称他为”调用处理器”,简单说这个类就是,对我们需要的方法进行处理的,invoke方法会主动调用,我们需要的是处理它的内部实现。
cglib动态代理 1 2 3 4 5 6 7 8 9 10 11 12 13 14 15 16 17 18 19 20 21 22 23 24 25 26 27 28 29 30 31 public class CglibProxy implements MethodInterceptor private Object target; public Object getInstance (Object target) this .target = target; Enhancer enhancer = new Enhancer(); enhancer.setSuperclass(this .target.getClass()); enhancer.setCallback(this ); return enhancer.create(); } @Override public Object intercept (Object o, Method method, Object[] args, MethodProxy methodProxy) throws Throwable if (target == null ) return null ; Object result; System.out.println("事物开始" ); result = methodProxy.invokeSuper(o, args); System.out.println("事物结束" ); return result; } }
1 2 3 4 5 6 7 8 public class CglibMain public static void main (String[] params) CglibProxy proxy = new CglibProxy(); Xiaoming xiaoming = (Xiaoming) proxy.getInstance(new Xiaoming()); xiaoming.doSomeThing(); } }
是不是和jdk的动态代理差不多的。先创建代理对象,然后拦截方法的。
看到上面写了一堆是不是感觉没什么用,是吧,这样想就对啦,这里列出一个实际的例子,比如我们有这样一个需求,需要在一定的范围内禁止掉List的add方法:
1 2 3 4 5 6 7 8 9 10 11 12 13 14 15 16 public static List getList (final List list) return (List) Proxy.newProxyInstance(list.getClass().getClassLoader(), new Class[]{List.class}, new InvocationHandler() { public Object invoke (Object proxy, Method method, Object[] args) throws Throwable if ("add" .equals(method.getName())) { throw new UnsupportedOperationException(); } else { return method.invoke(list, args); } } }); }
哈哈,是不是很奇妙的。
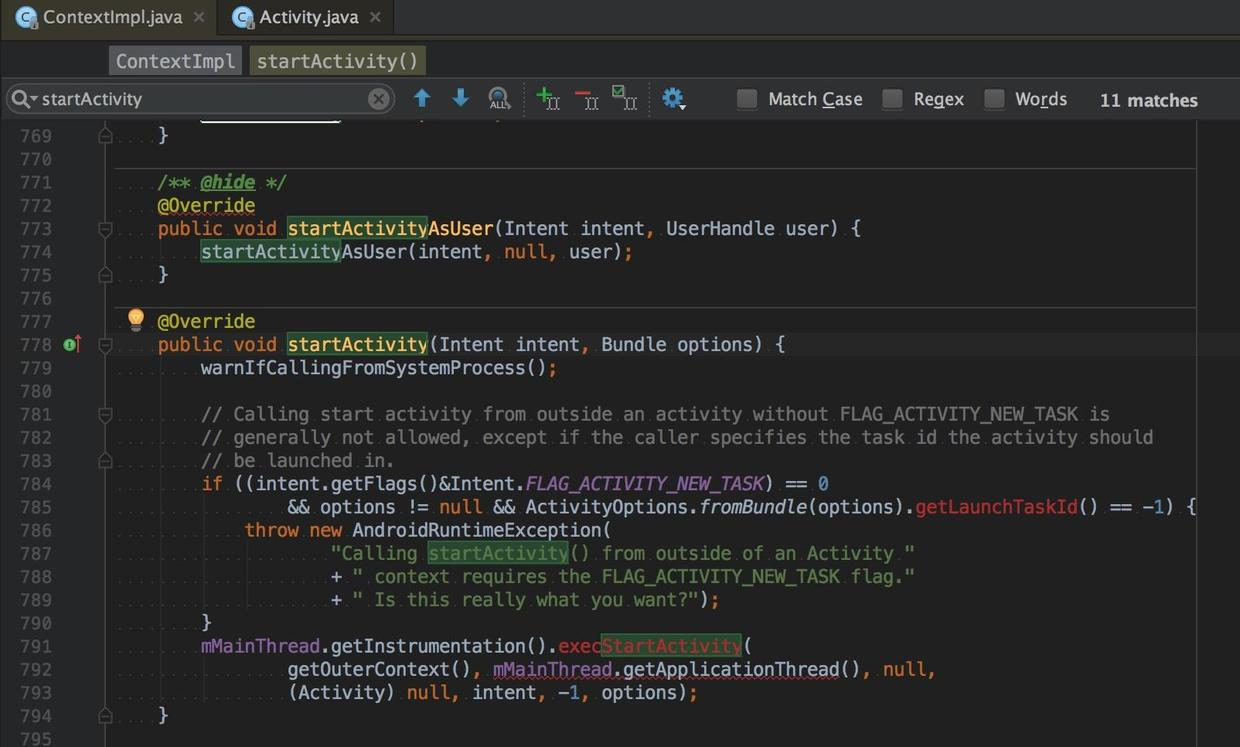
Hook Instrumentation创建Activity的方法 我在Android的资源管理器的创建过程 里面写到过,启动Activity即Activity的创建过程了的。weishu 大神说过的。
1 2 3 4 5 6 7 8 9 10 11 12 13 14 15 16 17 18 19 20 21 22 23 24 25 26 27 28 public class HookHelper public static void hookContextStartActivity () throws Exception Class<?> activityThreadClass = Class.forName("android.app.ActivityThread" ); Method currentActivityThreadMethod = activityThreadClass.getDeclaredMethod("currentActivityThread" ); currentActivityThreadMethod.setAccessible(true ); Object currentActivityThread = currentActivityThreadMethod.invoke(null ); Field mInstrumentationField = activityThreadClass.getDeclaredField("mInstrumentation" ); mInstrumentationField.setAccessible(true ); Instrumentation mInstrumentation = (Instrumentation) mInstrumentationField.get(currentActivityThread); EvilInstrumentation evilInstrumentation = new EvilInstrumentation(mInstrumentation); mInstrumentationField.set(currentActivityThread, evilInstrumentation); } }
1 2 3 4 5 6 7 8 9 10 11 12 13 14 15 16 17 18 19 20 21 22 23 24 25 26 27 28 29 30 31 32 33 34 35 36 37 38 39 40 41 42 43 44 45 46 47 48 49 50 51 52 53 54 55 56 57 58 59 public class EvilInstrumentation extends Instrumentation private static final String TAG = EvilInstrumentation.class.getSimpleName(); Instrumentation mBase; public EvilInstrumentation (Instrumentation base) mBase = base; } public ActivityResult execStartActivity ( Context who, IBinder contextThread, IBinder token, Activity target, Intent intent, int requestCode, Bundle options) Log.e(TAG, "\n执行了startActivity, 参数如下: \n" + "who = [" + who + "], " + "\ncontextThread = [" + contextThread + "], \ntoken = [" + token + "], " + "\ntarget = [" + target + "], \nintent = [" + intent + "], \nrequestCode = [" + requestCode + "], \noptions = [" + options + "]" ); try { Method execStartActivity = Instrumentation.class.getDeclaredMethod( "execStartActivity" , Context.class, IBinder.class, IBinder.class, Activity.class, Intent.class, int .class, Bundle.class); execStartActivity.setAccessible(true ); return (ActivityResult) execStartActivity.invoke( mBase, who, contextThread, token, target, intent, requestCode, options); } catch (Exception e) { throw new RuntimeException("do not support pls adapt it" ); } } }
以上实现是weishu大神写的,我只是挪用。
1 2 3 4 5 6 7 8 9 10 11 12 13 14 15 16 17 18 19 20 21 22 23 24 25 26 27 28 29 30 public class MainActivity extends BaseActivity @Override protected void attachBaseContext (Context newBase) super .attachBaseContext(newBase); try { HookHelper.hookContextStartActivity(); } catch (Exception e) { e.printStackTrace(); } } @Override protected void onCreate (Bundle savedInstanceState) super .onCreate(savedInstanceState); setContentView(R.layout.activity_main); } public void contextStartAct (View view) Application application = getApplication(); Intent intent = new Intent(this , LaunchedActivity.class); intent.addFlags(Intent.FLAG_ACTIVITY_NEW_TASK); application.startActivity(intent); } public void activityStartAct (View view) Intent intent = new Intent(this , LaunchedActivity.class); startActivity(intent); } }
这里只是Hook了Context的startActivity,Activity是自己实现了startActivity的。
系统中的代理模式的使用 安卓系统中用到代理模式还是挺多的,与Binder相关的都是用到了代理模式的,关于Binder后面再说,我们平时写的AIDL都是用了代理模式的,一般在使用AIDL的时候,如果不需要跨进程就返回Binder本地对象,如果需要就返回代理对象。
这里先说一一个具体的代理的例子,然后说一下Binder中的代理,顺便说一下Binder。
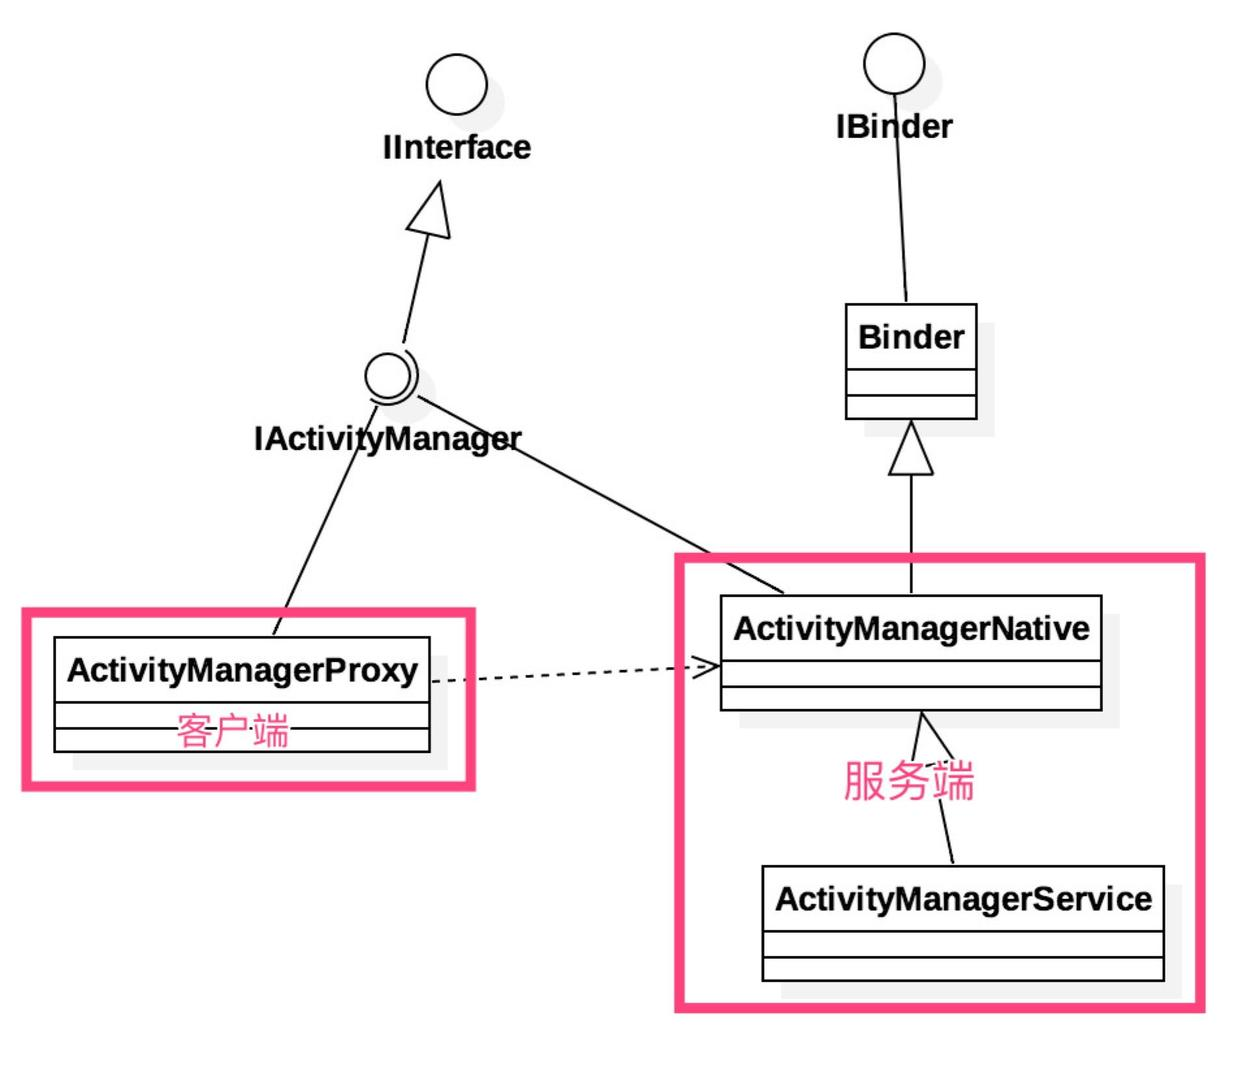
这个例子是ActivityManagerProxy的代理实现,它代理了ActivityManagerService这个类,然后在调用使用IActivityManager里面的方法的时候,因为真正的实现是ActivityManagerService,这个是运行在系统的进程中的,我们要调用的话就要跨进程调用了,安卓跨进程这里使用的是Binder。
Binder的一般套路是这样,因为跨进程,所以是分为客户端和服务端的,客户端就是运行在客户端进程中的,服务端就是运行在另外的进程,可能是系统的,可能是别人提供的某种服务(比如Google Play的支付就是使用),由于需要提供服务给使用,所以一般会定义一个接口,然后这个接口需要继承IInterface这个接口,这个接口的解释是这样的:
1 2 3 4 /** * Base class for Binder interfaces. When defining a new interface, * you must derive it from IInterface. */
就是说如果想用Binder实现跨进程,那么必须要继承这个类。IActivityManager,然后实现里面的方法即可,那其实为什么需要跨进程,其实就是我们需要调用的方法在服务端里面,那这里我们实现这些方法要写什么呢,怎么写呢,其实也是有套路的。
1 2 3 4 5 6 7 8 9 10 11 public void unregisterReceiver (IIntentReceiver receiver) throws RemoteException Parcel data = Parcel.obtain(); Parcel reply = Parcel.obtain(); data.writeInterfaceToken(IActivityManager.descriptor); data.writeStrongBinder(receiver.asBinder()); mRemote.transact(UNREGISTER_RECEIVER_TRANSACTION, data, reply, 0 ); reply.readException(); data.recycle(); reply.recycle(); }
随便找一个方法分析,其实就是构造一些参数,包括传递过去的和返回来的,然后使用mRemote这个对象去传递参数给服务端。所以在写AIDL的时候IDE可以帮我们自动生成代码,因为接口写完了的话,里面每个函数的实现套路都是一样的。Binder这个类并且实现接口,这里是IActivityManager,然后这里面就需要真的去实现IActivityManager接口里面想要做的事情了,这里需要注意下面的方法。
1 public boolean onTransact (int code, Parcel data, Parcel reply, int flags)
这个方法即是前面客户端调用真正会调用到的服务端的方法,服务端先调用到这里,然后填入参数,然后才会去调用IActivityManager 里面的具体实现的方法,如果有返回值,会写到reply里面的。
Binder里面套路差不多都是这样的,左边圈起来的是客户端,右边是服务端,服务端里面有真正的实现。服务端也叫Binder本地对象,我们写AIDL的时候,如果不需要跨进程的话,返回的是Binder本地的对象,就是服务端的,因为他里面有真正的实现的方法。不过一般在自己写AIDL的时候,服务端的真正的需要使用的方法还是我们自己实现的,反而客户端是代理对象,里面虽然也实现了接口里面一样的方法,不过这些方法都是一些跨进程的操作,传递对象到服务端,等待服务端返回值。
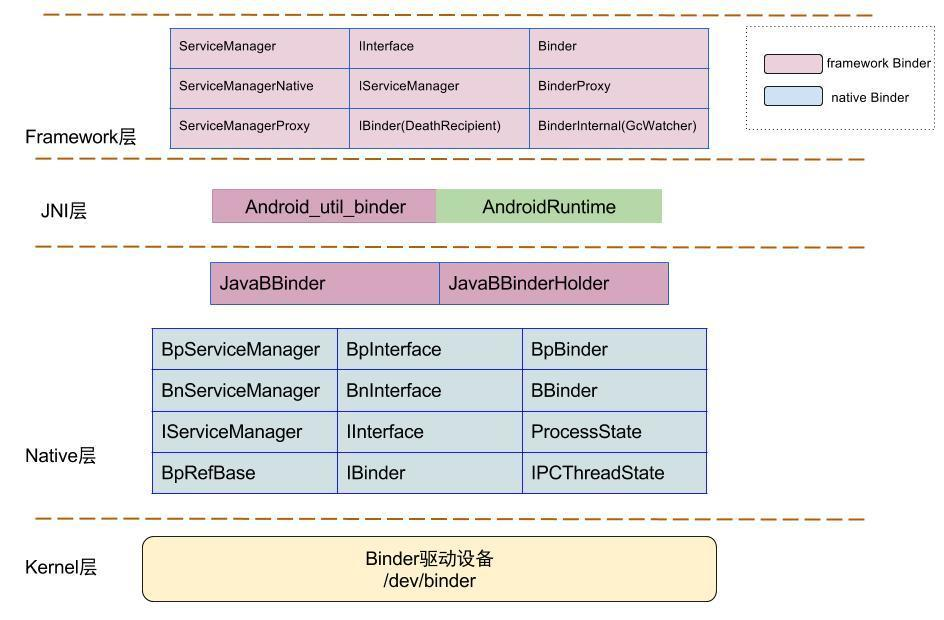
系统中的Binder跨进程通信 然后说说系统中的Binder跨进程通信吧。framework层Binder类图如下:Gityuan博客 .
1 2 3 4 5 6 7 8 9 10 11 12 int AndroidRuntime::startReg (JNIEnv* env) ATRACE_NAME("RegisterAndroidNatives" ); androidSetCreateThreadFunc((android_create_thread_fn) javaCreateThreadEtc); env->PushLocalFrame(200 ); if (register_jni_procs(gRegJNI, NELEM(gRegJNI), env) < 0 ) { env->PopLocalFrame(NULL ); return -1 ; } env->PopLocalFrame(NULL ); return 0 ; }
注册JNI方法,其中gRegJNI是一个数组,记录所有需要注册的jni方法,其中有一项便是REG_JNI(register_android_os_Binder)。
===> android_util_Binder.cpp—>register_android_os_Binder
1 2 3 4 5 6 7 8 9 10 11 int register_android_os_Binder (JNIEnv* env) if (int_register_android_os_Binder(env) < 0 ) return -1 ; if (int_register_android_os_BinderInternal(env) < 0 ) return -1 ; if (int_register_android_os_BinderProxy(env) < 0 ) return -1 ; ... return 0 ; }
分别注册Binder,BinderInternal,BinderProxy这三个java类对应的在JNI中的实现。建立了是java类在Native层与framework层之间的相互调用的桥梁。
注册服务:
1 2 3 4 5 6 7 8 9 10 11 12 13 14 public static void addService (String name, IBinder service) try { getIServiceManager().addService(name, service, false ); } catch (RemoteException e) { } } private static IServiceManager getIServiceManager () if (sServiceManager != null ) { return sServiceManager; } sServiceManager = ServiceManagerNative.asInterface(BinderInternal.getContextObject()); return sServiceManager; }
这里的就是刚上面说的,会注册java方法和JNI方法的映射。也就是会调用android_util_Binder.cpp里的android_os_BinderInternal_getContextObject方法。
1 2 3 4 5 6 7 8 9 ====>android_util_Binder.cpp static const JNINativeMethod gBinderInternalMethods[] = { { "getContextObject" , "()Landroid/os/IBinder;" , (void *)android_os_BinderInternal_getContextObject }, { "joinThreadPool" , "()V" , (void *)android_os_BinderInternal_joinThreadPool }, { "disableBackgroundScheduling" , "(Z)V" , (void *)android_os_BinderInternal_disableBackgroundScheduling }, { "setMaxThreads" , "(I)V" , (void *)android_os_BinderInternal_setMaxThreads }, { "handleGc" , "()V" , (void *)android_os_BinderInternal_handleGc } };
1 2 3 4 5 static jobject android_os_BinderInternal_getContextObject (JNIEnv* env, jobject clazz) sp<IBinder> b = ProcessState::self()->getContextObject(NULL ); return javaObjectForIBinder(env, b); }
===>ProcessState.cpp
1 2 3 4 sp<IBinder> ProcessState::getContextObject (const sp<IBinder>& ) return getStrongProxyForHandle(0 ); }
1 2 3 4 5 6 7 8 9 10 11 12 13 14 15 16 17 18 19 20 21 22 23 24 25 26 sp<IBinder> ProcessState::getStrongProxyForHandle (int32_t handle) sp<IBinder> result; AutoMutex _l(mLock); handle_entry* e = lookupHandleLocked(handle); if (e != NULL ) { IBinder* b = e->binder; if (b == NULL || !e->refs->attemptIncWeak(this )) { if (handle == 0 ) { Parcel data; status_t status = IPCThreadState::self()->transact( 0 , IBinder::PING_TRANSACTION, data, NULL , 0 ); if (status == DEAD_OBJECT) return NULL ; } b = new BpBinder(handle); e->binder = b; if (b) e->refs = b->getWeakRefs(); result = b; } else { result.force_set(b); e->refs->decWeak(this ); } } return result; }
ProcessState::self()->getContextObject()等价于 new BpBinder(0)。对于javaObjectForIBinder 这个方法。
====>android_util_Binder.cpp
1 2 3 4 5 6 7 8 9 10 11 12 13 14 15 16 17 18 19 20 21 22 23 24 25 26 27 28 29 30 31 32 33 34 35 36 37 38 39 40 41 42 43 44 45 46 47 48 49 50 51 52 53 54 jobject javaObjectForIBinder (JNIEnv* env, const sp<IBinder>& val) if (val == NULL ) return NULL ; if (val->checkSubclass(&gBinderOffsets)) { jobject object = static_cast <JavaBBinder*>(val.get())->object(); LOGDEATH("objectForBinder %p: it's our own %p!\n" , val.get(), object); return object; } AutoMutex _l(mProxyLock); jobject object = (jobject)val->findObject(&gBinderProxyOffsets); if (object != NULL ) { jobject res = jniGetReferent(env, object); if (res != NULL ) { ALOGV("objectForBinder %p: found existing %p!\n" , val.get(), res); return res; } LOGDEATH("Proxy object %p of IBinder %p no longer in working set!!!" , object, val.get()); android_atomic_dec(&gNumProxyRefs); val->detachObject(&gBinderProxyOffsets); env->DeleteGlobalRef(object); } object = env->NewObject(gBinderProxyOffsets.mClass, gBinderProxyOffsets.mConstructor); if (object != NULL ) { LOGDEATH("objectForBinder %p: created new proxy %p !\n" , val.get(), object); env->SetLongField(object, gBinderProxyOffsets.mObject, (jlong)val.get()); val->incStrong((void *)javaObjectForIBinder); jobject refObject = env->NewGlobalRef( env->GetObjectField(object, gBinderProxyOffsets.mSelf)); val->attachObject(&gBinderProxyOffsets, refObject, jnienv_to_javavm(env), proxy_cleanup); sp<DeathRecipientList> drl = new DeathRecipientList; drl->incStrong((void *)javaObjectForIBinder); env->SetLongField(object, gBinderProxyOffsets.mOrgue, reinterpret_cast <jlong>(drl.get())); android_atomic_inc(&gNumProxyRefs); incRefsCreated(env); } return object; }
根据BpBinder(C++)生成BinderProxy(Java)对象. 主要工作是创建BinderProxy对象,并把BpBinder对象地址保存到BinderProxy.mObject成员变量. 到此,可知ServiceManagerNative.asInterface(BinderInternal.getContextObject()) 等价于:
1 ServiceManagerNative.asInterface(new BinderProxy())
ServiceManagerNative.asInterface这个方法如下:
1 2 3 4 5 6 7 8 9 10 11 12 static public IServiceManager asInterface (IBinder obj) if (obj == null ) { return null ; } IServiceManager in = (IServiceManager)obj.queryLocalInterface(descriptor); if (in != null ) { return in; } return new ServiceManagerProxy(obj); }
1 2 3 4 5 final class BinderProxy implements IBinder public IInterface queryLocalInterface (String descriptor) return null ; } }
由此,可知ServiceManagerNative.asInterface(new BinderProxy()) 等价于new ServiceManagerProxy(new BinderProxy()).
===> ServiceManagerProxy—>addService
1 2 3 4 5 6 7 8 9 10 11 12 public void addService (String name, IBinder service, boolean allowIsolated) throws RemoteException { Parcel data = Parcel.obtain(); Parcel reply = Parcel.obtain(); data.writeInterfaceToken(IServiceManager.descriptor); data.writeString(name); data.writeStrongBinder(service); data.writeInt(allowIsolated ? 1 : 0 ); mRemote.transact(ADD_SERVICE_TRANSACTION, data, reply, 0 ); reply.recycle(); data.recycle(); }
前面已经说了mRemote是BinderProxy了。
1
2
public native boolean transactNative (int code, Parcel data, Parcel reply, int flags) throws RemoteException
Java层的BinderProxy.transact()最终交由Native层的BpBinder::transact()完成。