最近在研究Android的插件化,插件化需要解决的问题大概有这样的几个,为什么需要插件化技术这个就不说啦。
参考:
Android资源管理框架(Asset Manager)简要介绍和学习计划
Android应用程序的Activity启动过程简要介绍和学习计划
Android源码分析-Activity的启动过程
这篇文章浅解一下Android的资源管理器的创建过程。这里说一下,其实很多人对插件化的资源加载有一个误区呀,就是一般别人说插件化需要解决一个资源冲突的问题,这里有一个很重要的问题。
为什么会有资源冲突的问题?
这个问题其实不应该放在最前面说的,但是很多人都有一个误区,感觉必须先说一下这个了。
首先看Android的资源分类,Android的资源可分为两大类。分别是Asserts和Res。
- Asserts
assets类资源放在工程根目录的Assets子目录下,这些文件最终会被原装不动地打包在apk文件中。如果我们要在程序中访问这些文件,那么就需要指定文件名来访问。
- Res
res资源比较多,放一张图吧,基本一看就明白。
res资源大概是这样的啦,当然还有raw以及xml等资源啦。在编译打包的过程中,会把资源文件打包成二进制文件(.xml文件打包成二进制文件,png文件进行优化等)。会对除了assets资源之外所有的资源赋予一个资源ID常量,并且会生成一个资源索引表resources.arsc。
这个resources.arsc文件记录了所有的应用程序资源目录的信息,包括每一个资源名称、类型、值、ID以及所配置的维度信息。我们可以将这个resources.arsc文件想象成是一个资源索引表,这个资源索引表在给定资源ID和设备配置信息的情况下,能够在应用程序的资源目录中快速地找到最匹配的资源。
这些资源ID被终会被定义为Java常量值,保存在一个R.java文件中,与应用程序的其它源文件一起被编译到程序中,这样我们就可以在程序或者资源文件中通过这些ID常量来访问指定的资源。
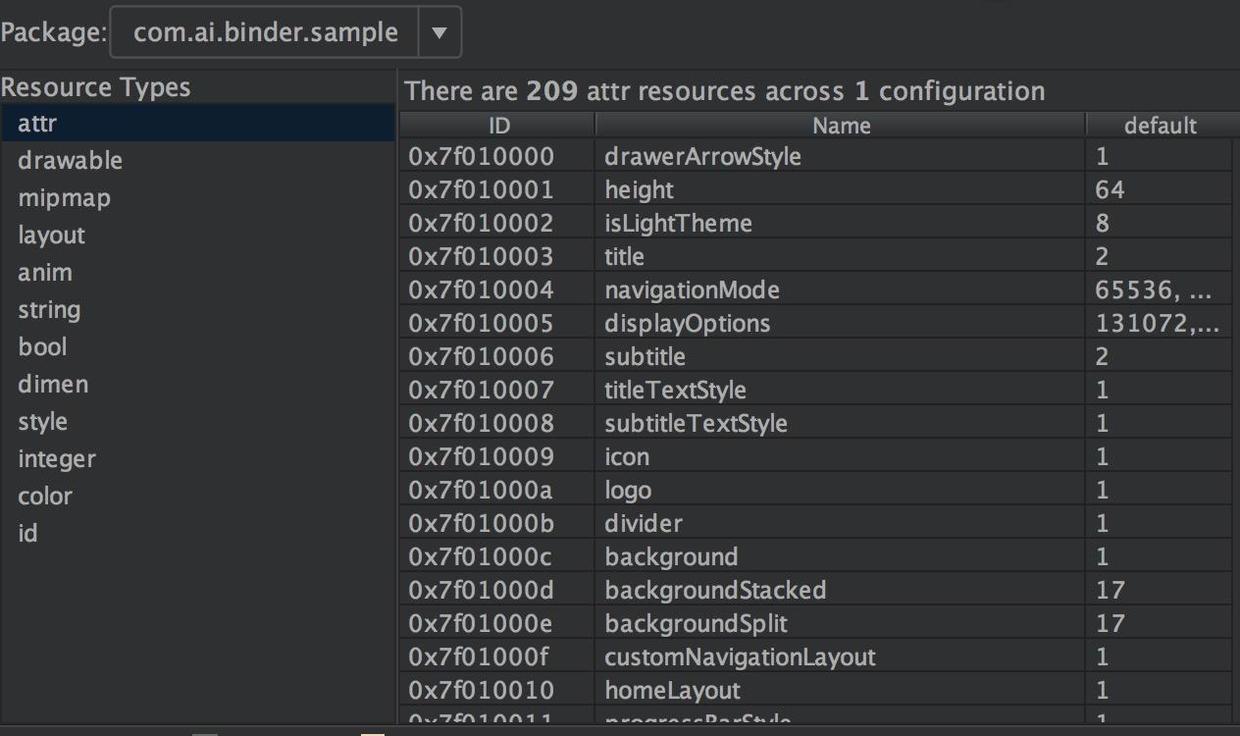
资源ID的最终的格式是:0xPPTTNNNN
资源ID是一个4字节的无符号整数,其中,最高字节表示Package ID,次高字节表示Type ID,最低两字节表示Entry ID。
- PP Package ID相当于是一个命名空间,限定资源的来源。
Android系统当前定义了两个资源命令空间,其中一个系统资源命令空间(比如我们可以直接引用系统提供好的主题等),它的Package ID等于0x01,另外一个是应用程序资源命令空间,它的Package ID等于0x7F。系统资源包的Package ID就等于0x01,而我们在应用程序中定义的资源的Package ID的值都等于0x7F,上图就可以看出来的。
- TT Type ID是指资源的类型ID。
资源的类型有animator、anim、color、string和xml等等若干种,每一种都会被赋予一个ID。上图也可以看出来的。
- NNNN Entry ID是指每一个资源在其所属的资源类型中所出现的次序。
注意,不同类型的资源的Entry ID有可能是相同的,但是由于它们的类型不同,我们仍然可以通过其资源ID来区别开来。
上面说这么多就是想说,我们写的App通常情况下资源等的ID都是0x7F开始的,插件化的时候,开发插件是当作一个App来开发的,打包的时候资源ID也是0x7F开始的,所以呢,这个插件与插件,插件与宿主的资源ID很有可能是一样的。
下面说的是重点:
在插件化的开发过程中,加载插件的资源可以单独创建了用于访问插件资源的AssertManager和Resource对象,即插件独立使用一个资源管理器,这样宿主访问宿主的资源,插件访问插件的资源,这样子是不会出现资源冲突问题的。然而这个(插件使用单独的资源管理器)在现实中是不切实际的,一般都会将插件的资源路径添加到宿主的AssetManager中,这样做的原因是为了插件与宿主之间的资源共享,资源共享的原因主要是为了减少插件的体积。
现阶段对资源冲突的解决方案:
- 修改aapt源码,定制aapt工具编译期间修改PP段。
例如:atlas
- 修改aapt的产物,即编译后期重新整理插件Apk的资源,编排ID。
例如:Small
这两种方案都可以,修改aapt的源代码,虽然说比较麻烦,但是其实需要修改的代码是比较少的,不过需要你有个Android的源码的环境才能编译出aappt可执行文件,修改aapt的产物,一般是写gradle插件来实现,因为Android的源代码是知道的,所以我们能知道aapt最后生成的二进制文件的格式,然后自己整理资源的ID。
Android framework层的资源查找
1.我们正常的使用资源的过程
在Android系统中,每一个应用程序一般都会配置很多资源,用来适配不同密度、大小和方向的屏幕,以及适配不同的国家、地区和语言等等。这些资源是在应用程序运行时自动根据设备的当前配置信息进行适配的。这也就是说,给定一个相同的资源ID,在不同的设备配置之下,查找到的可能是不同的资源。
这个查找过程对应用程序来说,是完全透明的,这个过程主要是靠Android资源管理框架来完成的,而Android资源管理框架实际是由AssetManager和Resources两个类来实现的。其中,Resources类可以根据ID来查找资源,而AssetManager类根据文件名来查找资源。事实上,如果一个资源ID对应的是一个文件,那么Resources类是先根据ID来找到资源文件名称,然后再将该文件名称交给AssetManager类来打开对应的文件的。
注:上面这段话出自美团Android资源混淆保护实践
一般我们查找Assert资源代码如下:
1
2
3
4
5
| try {
getAssets().open("name");
} catch (IOException e) {
e.printStackTrace();
}
|
查找Res资源代码如下:
1
2
| Resources resources = getResources();
String name = resources.getString(R.string.app_name);
|
继续跟踪resources.getString的实现:
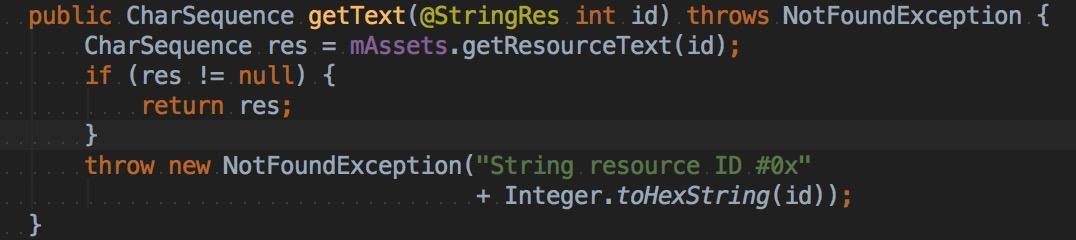
可以看到确实是使用的AssetManager来处理的。
2.上下文环境Context的创建
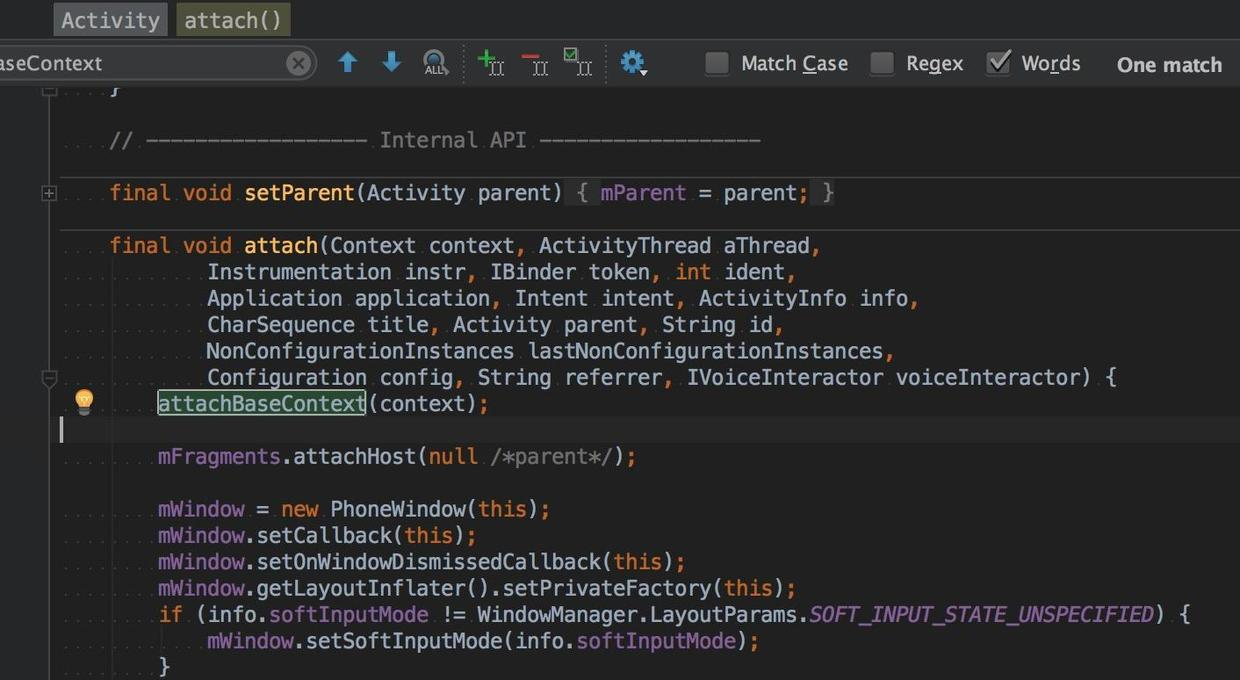
前面说了,查找资源使用的是Resources和AssetManager,那我们来跟踪一下这两个类的创建生成吧。
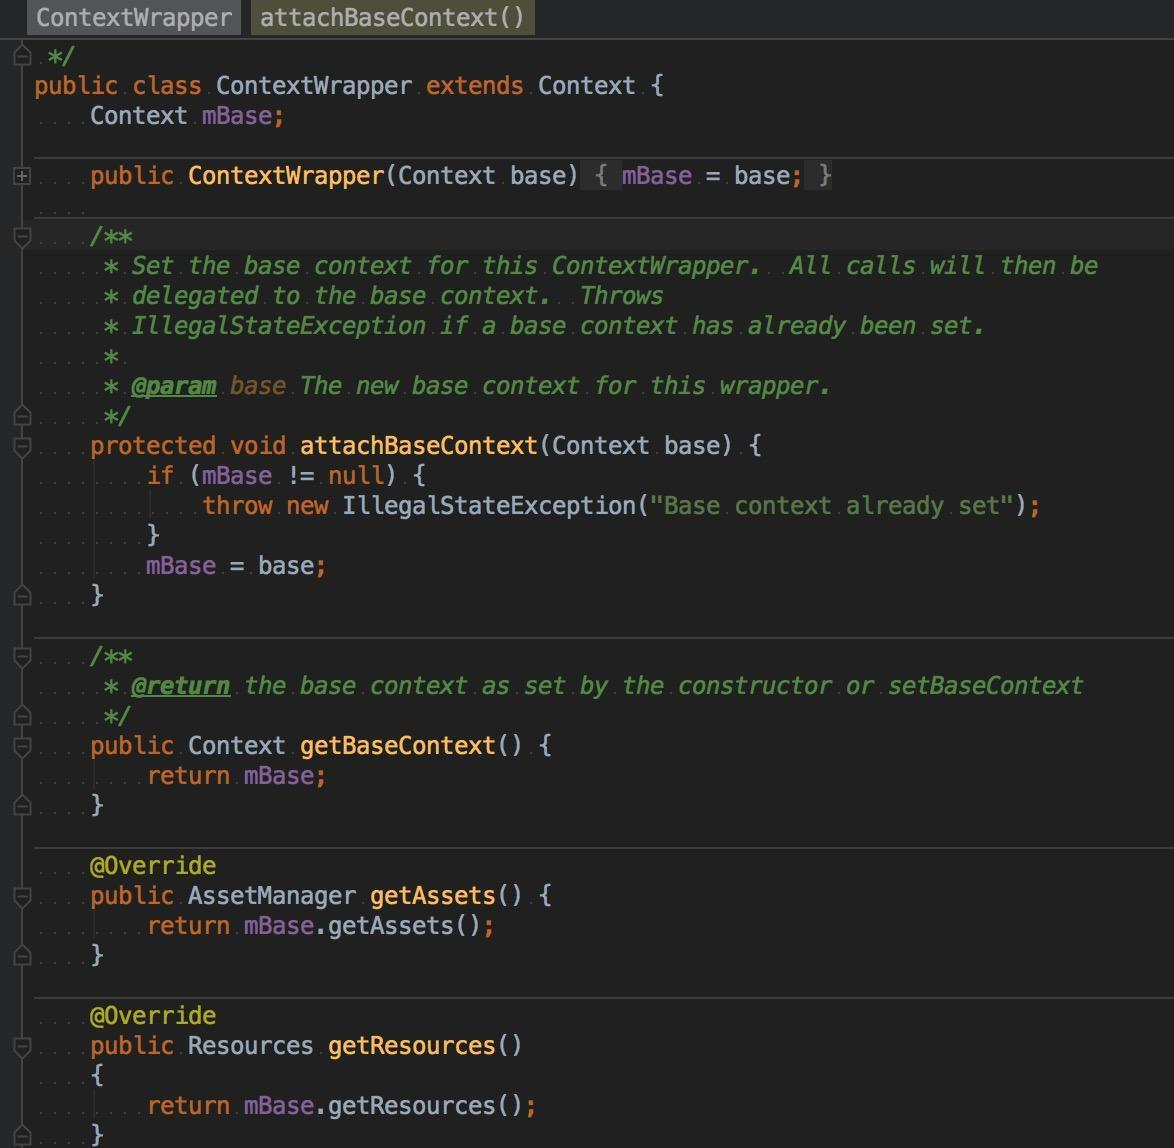
我们会很清楚的发现这两个类全部是由Context创建的,所以现在需要找到mBase即Context的生成过程,从上图清晰可见的是mBase的生成时机是在attachBaseContext这个方法中,找到哪里调用这个方法,最后在子类Activity中找到了调用的时机。
通过这个方法名,我们大概就知道,这个方法是Activity创建的时候会调用的,现在我们应该看看,一个Activity是怎样创建出来的咯。
说到Activity的创建,首先应该想到Activity#startActivity方法的,从上往下看,显然最后都是调用的Activity#startActivityForResult来实现的。
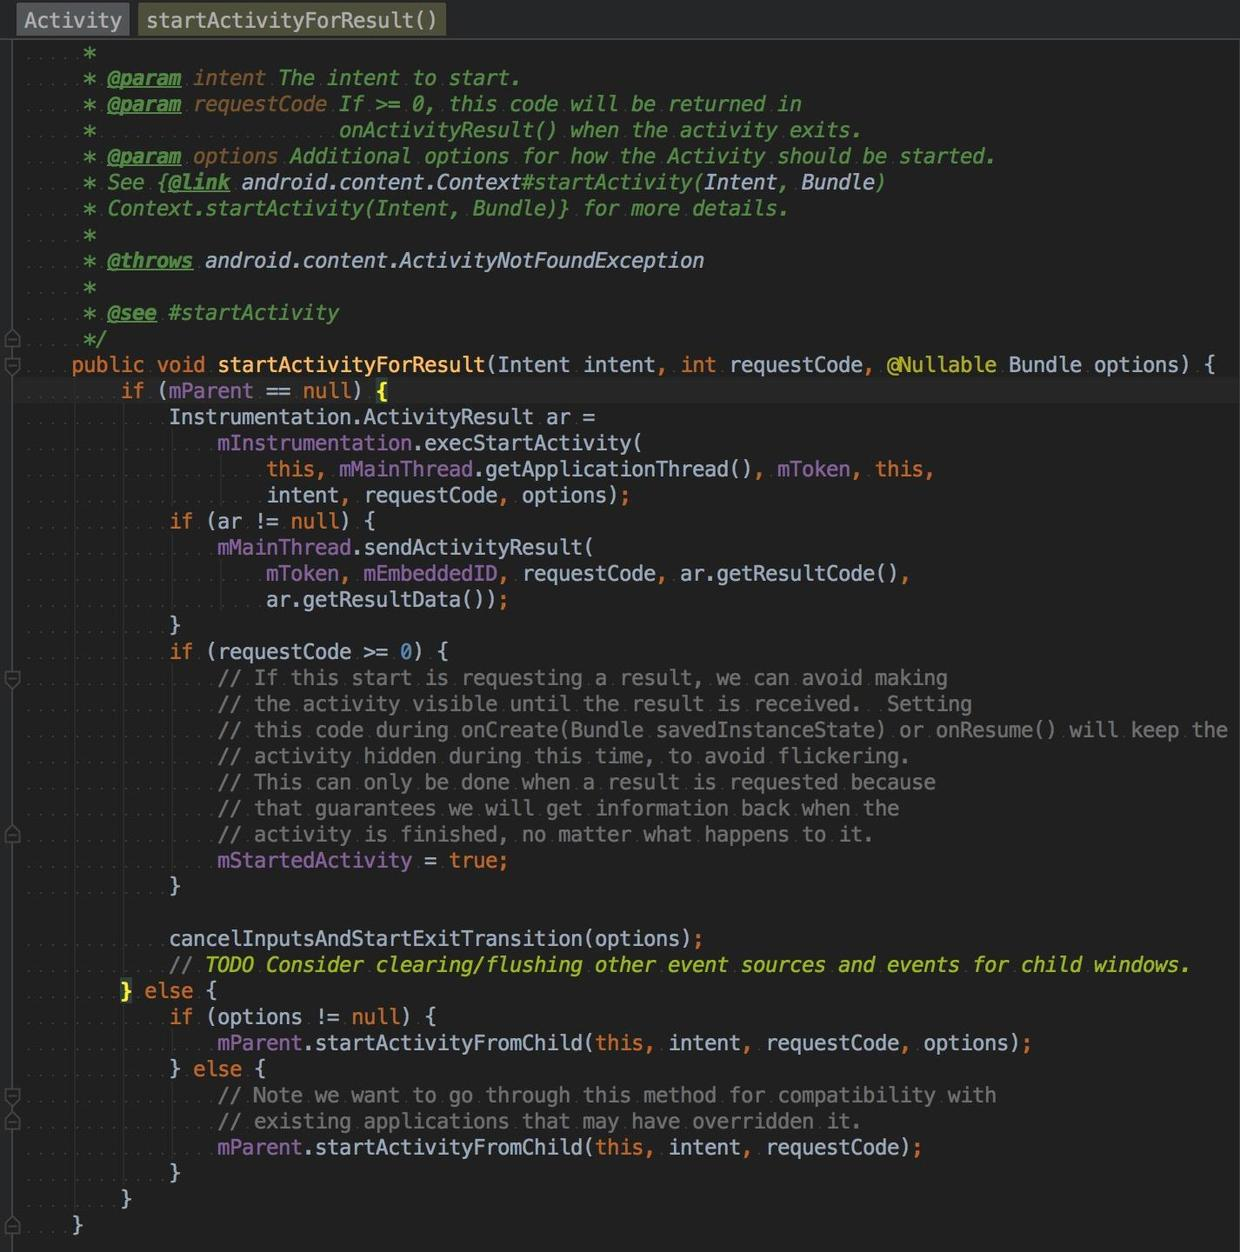
可以发现真正打开Activity的实现在Instrumentation的execStartActivity方法中,我们去看他的实现:
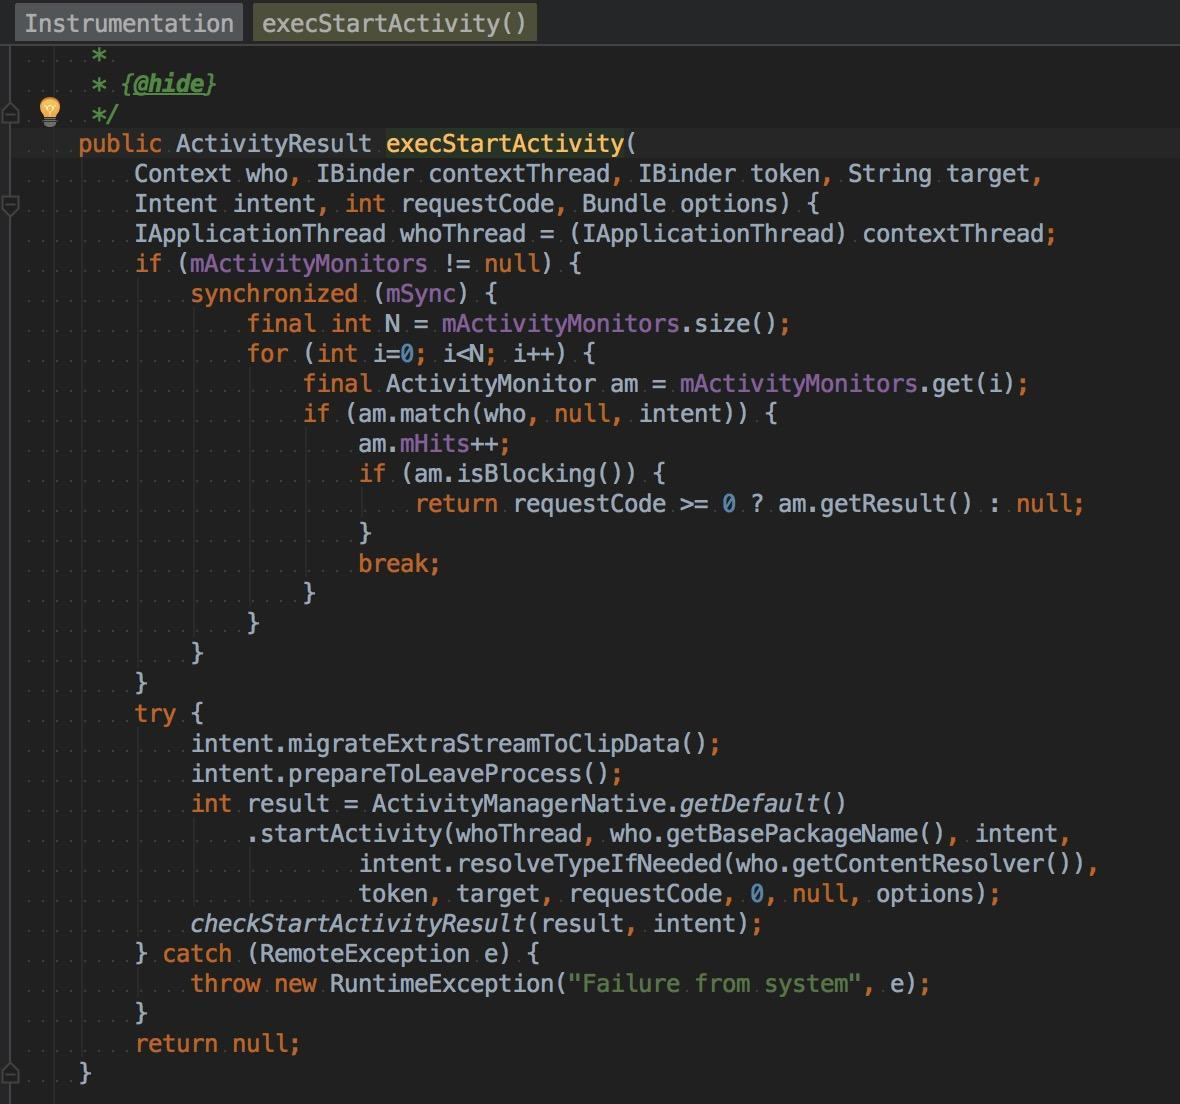
然后观察,发现最后调用的是:
int result = ActivityManagerNative.getDefault().startActivity(whoThread, who.getBasePackageName(),intent,intent.resolveTypeIfNeeded(who.getContentResolver()),token, target, requestCode, 0, null, options);
这里的ActivityManagerNative.getDefault返回IActivityManager对象,由于需要启动的Activity不一定是我们当前进程的,比如Launcher在桌面启动一个应用就会新开个进程的。这里就会有IPC交互,这里返回的IActivityManager ,如果是和当前进程在同一个进程就是ActivityManagerNative的子类,因为IActivityManager接口里面的方法它都没有实现的,如果不在同一个进程这个IActivityManager对象就是ActivityManagerProxy对象。
IActivityManager在Binder的Server端的实现是ActivityManagerService。所以最后startActivity调用的是ActivityManagerService的startActivity方法。
1
2
3
4
5
6
7
8
9
10
11
12
13
14
15
16
17
18
19
20
21
22
23
| public final class ActivityManagerService extends ActivityManagerNative
implements Watchdog.Monitor, BatteryStatsImpl.BatteryCallback {
@Override
public final int startActivity(IApplicationThread caller, String callingPackage,
Intent intent, String resolvedType, IBinder resultTo, String resultWho, int requestCode,
int startFlags, ProfilerInfo profilerInfo, Bundle options) {
return startActivityAsUser(caller, callingPackage, intent, resolvedType, resultTo,
resultWho, requestCode, startFlags, profilerInfo, options,
UserHandle.getCallingUserId());
}
@Override
public final int startActivityAsUser(IApplicationThread caller, String callingPackage,
Intent intent, String resolvedType, IBinder resultTo, String resultWho, int requestCode,
int startFlags, ProfilerInfo profilerInfo, Bundle options, int userId) {
enforceNotIsolatedCaller("startActivity");
userId = handleIncomingUser(Binder.getCallingPid(), Binder.getCallingUid(), userId,
false, ALLOW_FULL_ONLY, "startActivity", null);
return mStackSupervisor.startActivityMayWait(caller, -1, callingPackage, intent,
resolvedType, null, null, resultTo, resultWho, requestCode, startFlags,
profilerInfo, null, null, options, false, userId, null, null);
}
}
|
然后调用的是
ActivityStackSupervisor#startActivityMayWait --->ActivityStackSupervisor#startActivityLocked --->ActivityStackSupervisor#startActivityUncheckedLocked --->ActivityStack#startActivityLocked --->ActivityStackSupervisor#resumeTopActivitiesLocked --->ActivityStackSupervisor#resumeTopActivityLocked --->ActivityStack#resumeTopActivityInnerLocked --->ActivityStackSupervisor#startSpecificActivityLocked --->ActivityStackSupervisor#realStartActivityLocked
过程非常复杂,在最后的方法里面调用了
app.thread.scheduleLaunchActivity(new Intent(r.intent), r.appToken,System.identityHashCode(r), r.info, newConfiguration(mService.mConfiguration),new Configuration(stack.mOverrideConfig), r.compat, r.launchedFromPackage,task.voiceInteractor, app.repProcState, r.icicle, r.persistentState, results,newIntents, !andResume, mService.isNextTransitionForward(), profilerInfo);,这里的app.thread对象是IApplicationThread接口类型的对象。
IApplicationThread对象的Server端的实现是ApplicationThreadNative的子类ApplicationThread(它是ActivityThread的内部类),Proxy本地的代理实现是ApplicationThreadProxy。
最后调用的是下面的方法:
1
2
3
4
5
6
7
8
9
10
11
12
13
14
15
| public final class ActivityThread {
private class ApplicationThread extends ApplicationThreadNative {
@Override
public final void scheduleLaunchActivity(Intent intent, IBinder token, int ident,
ActivityInfo info, Configuration curConfig, Configuration overrideConfig,
CompatibilityInfo compatInfo, String referrer, IVoiceInteractor voiceInteractor,
int procState, Bundle state, PersistableBundle persistentState,
List<ResultInfo> pendingResults, List<ReferrerIntent> pendingNewIntents,
boolean notResumed, boolean isForward, ProfilerInfo profilerInfo) {
sendMessage(H.LAUNCH_ACTIVITY, r);
}
}
}
|
函数中的处理就是Android的消息系统的正常处理流程了,因为这个是ActivityThread的内部类,那么对应的Handler应该在ActivityThread里面的,最后可以找到是H.handleMessage处理的啦。
下面调用的是ActivityThread的:
1
2
3
| private void handleLaunchActivity(ActivityClientRecord r, Intent customIntent);
--->
private Activity performLaunchActivity(ActivityClientRecord r, Intent customIntent);
|
来看看这个方法:
1
2
3
4
5
6
7
8
9
10
11
12
13
14
15
16
17
18
19
20
21
22
23
24
25
26
27
28
29
30
31
32
33
34
35
36
37
38
39
40
41
42
43
44
45
46
47
48
49
50
51
52
53
54
| private Activity performLaunchActivity(ActivityClientRecord r, Intent customIntent) {
ActivityInfo aInfo = r.activityInfo;
ComponentName component = r.intent.getComponent();
Activity activity = null;
try {
java.lang.ClassLoader cl = r.packageInfo.getClassLoader();
activity = mInstrumentation.newActivity(
cl, component.getClassName(), r.intent);
StrictMode.incrementExpectedActivityCount(activity.getClass());
r.intent.setExtrasClassLoader(cl);
r.intent.prepareToEnterProcess();
if (r.state != null) {
r.state.setClassLoader(cl);
}
} catch (Exception e) {
}
try {
Application app = r.packageInfo.makeApplication(false, mInstrumentation);
if (activity != null) {
Context appContext = createBaseContextForActivity(r, activity);
CharSequence title = r.activityInfo.loadLabel(appContext.getPackageManager());
Configuration config = new Configuration(mCompatConfiguration);
if (customIntent != null) {
activity.mIntent = customIntent;
}
r.lastNonConfigurationInstances = null;
activity.mStartedActivity = false;
int theme = r.activityInfo.getThemeResource();
if (theme != 0) {
activity.setTheme(theme);
}
activity.mCalled = false;
if (r.isPersistable()) {
mInstrumentation.callActivityOnCreate(activity, r.state, r.persistentState);
} else {
mInstrumentation.callActivityOnCreate(activity, r.state);
}
}
r.paused = true;
mActivities.put(r.token, r);
} catch (SuperNotCalledException e) {
throw e;
} catch (Exception e) {
}
return activity;
}
|
看到这里,我们终于找到了Activity里面的mBase变量是怎么生成的啦。现在看createBaseContextForActivity 这个方法就知道,Context的真正实现了一些我们想知道方法的类是哪个啦。
1
2
3
4
5
6
7
8
9
10
11
12
13
14
| private Context createBaseContextForActivity(ActivityClientRecord r, final Activity activity) {
int displayId = Display.DEFAULT_DISPLAY;
try {
displayId = ActivityManagerNative.getDefault().getActivityDisplayId(r.token);
} catch (RemoteException e) {
}
ContextImpl appContext = ContextImpl.createActivityContext(
this, r.packageInfo, displayId, r.overrideConfig);
appContext.setOuterContext(activity);
Context baseContext = appContext;
return baseContext;
}
|
这里我们终于知道,Context的最终的实现类是ContextImpl 啦。
Android应用程序窗口的运行上下文环境是通过ContextImpl类来描述的,即每一个Activity组件都关联有一个ContextImpl对象。ContextImpl类继承了Context类,它与Activity组件的关系如图所示:
图片取自Android应用程序窗口(Activity)的运行上下文环境(Context)的创建过程分析
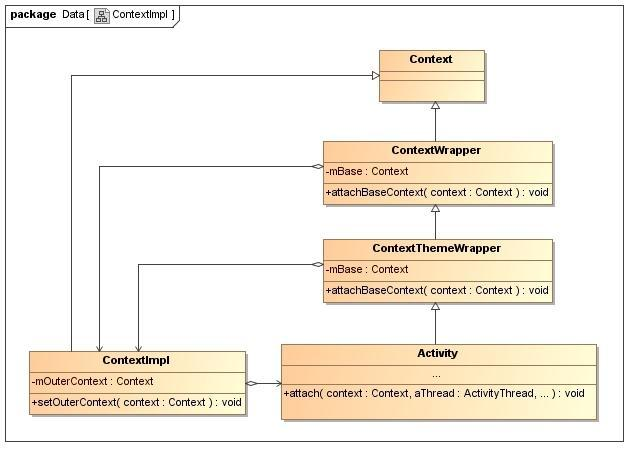
这里我们解决了Activity里面的Context是怎么生成的问题。
3. AssetManager的创建过程
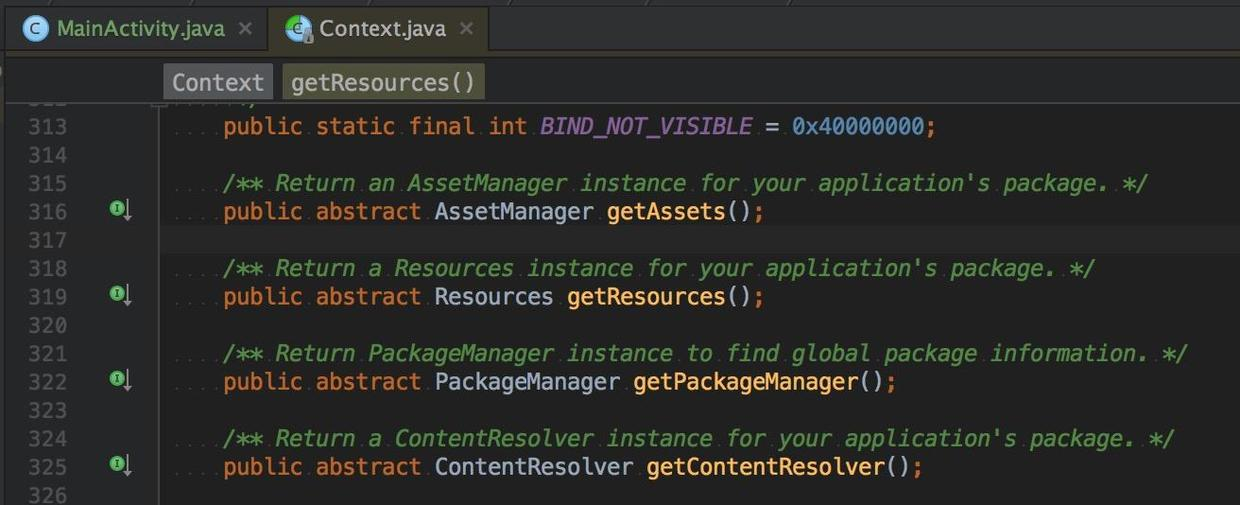
上面我们已经知道了,Activity里面的Context的创建了,那么那两个获取资源的方法在ContextImpl里面是怎样的呢。
1
2
3
4
5
6
7
8
9
10
| public class ContextImpl {
@Override
public AssetManager getAssets() {
return getResources().getAssets();
}
@Override
public Resources getResources() {
return mResources;
}
}
|
ContextImpl类的成员函数getResources返回的是一个Resources对象,有了这个Resources对象之后,我们就可以通过资源ID来访问那些被编译过的应用程序资源了。ContextImpl类的成员函数getAssets返回的是一个AssetManager对象,有了这个AssetManager对象之后,我们就可以通过文件名来访问那些被编译过或者没有被编译过的应用程序资源文件了。事实上,Resources类也是通过AssetManager类来访问那些被编译过的应用程序资源文件的,不过在访问之前,它会先根据资源ID查找得到对应的资源文件名。
首先看ContextImpl的Resources对象的产生过程:
1
2
3
4
5
6
7
8
9
10
11
12
13
14
15
16
17
18
| private ContextImpl(ContextImpl container, ActivityThread mainThread,
LoadedApk packageInfo, IBinder activityToken, UserHandle user, boolean restricted,
Display display, Configuration overrideConfiguration, int createDisplayWithId) {
mResourcesManager = ResourcesManager.getInstance();
Resources resources = packageInfo.getResources(mainThread);
if (resources != null) {
if (displayId != Display.DEFAULT_DISPLAY
|| overrideConfiguration != null
|| (compatInfo != null && compatInfo.applicationScale
!= resources.getCompatibilityInfo().applicationScale)) {
resources = mResourcesManager.getTopLevelResources(packageInfo.getResDir(),
packageInfo.getSplitResDirs(), packageInfo.getOverlayDirs(),
packageInfo.getApplicationInfo().sharedLibraryFiles, displayId,
overrideConfiguration, compatInfo);
}
}
mResources = resources;
}
|
参数packageInfo指向的是一个LoadedApk对象,这个LoadedApk对象描述的是当前正在启动的Activity组所属的Apk。用来访问应用程序资源的Resources对象是通过调用参数packageInfo所指向的是一个LoadedApk对象的成员函数getResources来创建的。这个Resources对象创建完成之后,由于应用程序的一些其他设置可能改变,需要重新生成Resource,最终生成的对象,就会保存在ContextImpl类的成员变量mResources中。这两处生成Resources的方法最终都会调用到ResourcesManager的getTopLevelResources方法。
1
2
3
4
5
6
7
8
9
10
11
12
13
14
15
16
17
18
19
20
21
22
23
24
25
26
27
28
29
30
31
32
33
34
35
36
37
38
39
40
41
42
43
44
45
46
47
48
49
50
51
52
53
54
55
56
57
58
59
60
61
62
63
64
| Resources getTopLevelResources(String resDir, String[] splitResDirs,
String[] overlayDirs, String[] libDirs, int displayId,
Configuration overrideConfiguration, CompatibilityInfo compatInfo) {
final float scale = compatInfo.applicationScale;
Configuration overrideConfigCopy = (overrideConfiguration != null)
? new Configuration(overrideConfiguration) : null;
ResourcesKey key = new ResourcesKey(resDir, displayId, overrideConfigCopy, scale);
Resources r;
synchronized (this) {
AssetManager assets = new AssetManager();
if (resDir != null) {
if (assets.addAssetPath(resDir) == 0) {
return null;
}
}
if (splitResDirs != null) {
for (String splitResDir : splitResDirs) {
if (assets.addAssetPath(splitResDir) == 0) {
return null;
}
}
}
if (overlayDirs != null) {
for (String idmapPath : overlayDirs) {
assets.addOverlayPath(idmapPath);
}
}
if (libDirs != null) {
for (String libDir : libDirs) {
if (libDir.endsWith(".apk")) {
if (assets.addAssetPath(libDir) == 0) {
}
}
}
}
DisplayMetrics dm = getDisplayMetricsLocked(displayId);
Configuration config;
final boolean isDefaultDisplay = (displayId == Display.DEFAULT_DISPLAY);
final boolean hasOverrideConfig = key.hasOverrideConfiguration();
if (!isDefaultDisplay || hasOverrideConfig) {
config = new Configuration(getConfiguration());
if (!isDefaultDisplay) {
applyNonDefaultDisplayMetricsToConfigurationLocked(dm, config);
}
if (hasOverrideConfig) {
config.updateFrom(key.mOverrideConfiguration);
if (DEBUG) Slog.v(TAG, "Applied overrideConfig=" + key.mOverrideConfiguration);
}
} else {
config = getConfiguration();
}
r = new Resources(assets, dm, config, compatInfo);
return r;
}
}
|
getTopLevelResources来获得一个Resources对象的时候,需要指定要获取的Resources对象所对应的Apk文件路径,这个Apk文件路径就保存在LoadedApk类的成员变量mResDir中,这里还可能有其他的资源路径,也可以添加。
这样就创建出了Resources对象和AssertManager对象啦。
下面看AssetManager类的构造函数和成员函数addAssetPath的实现,接着再看Resources类的构造函数的实现。
1
2
3
4
5
6
7
8
9
10
11
| public AssetManager() {
synchronized (this) {
if (DEBUG_REFS) {
mNumRefs = 0;
incRefsLocked(this.hashCode());
}
init(false);
if (localLOGV) Log.v(TAG, "New asset manager: " + this);
ensureSystemAssets();
}
}
|
AssetManager类的构造函数是通过调用另外一个成员函数init来执行初始化工作的。在初始化完成当前正在创建的AssetManager对象之后,AssetManager类的构造函数还会调用另外一个成员函数ensureSystemAssets来检查当前进程是否已经创建了一个用来访问系统资源的AssetManager对象。
如果用来访问系统资源的AssetManager对象还没有创建的话,那么AssetManager类的成员函数ensureSystemAssets就会创建并且初始化它,并且将它保存在AssetManager类的静态成员变量sSystem中。注意,创建用来访问系统资源和应用程序资源的AssetManager对象的过程是一样的,区别只在于它们所要访问的Apk文件不一样。
addAssetPath的C++实现在android_util_AssetManager.cpp
C++实在太差。
通过搜索java对应的方法即可找到C++对应的方法啦。
1
2
3
4
5
| {
"addAssetPathNative",
"(Ljava/lang/String;Z)I",
(void*) android_content_AssetManager_addAssetPath
}
|
1
2
3
4
5
6
7
8
9
10
11
12
13
14
15
| static jint android_content_AssetManager_addAssetPath(JNIEnv* env, jobject clazz,
jstring path, jboolean appAsLib)
{
ScopedUtfChars path8(env, path);
if (path8.c_str() == NULL) {
return 0;
}
AssetManager* am = assetManagerForJavaObject(env, clazz);
if (am == NULL) {
return 0;
}
int32_t cookie;
bool res = am->addAssetPath(String8(path8.c_str()), &cookie, appAsLib);
return (res) ? static_cast<jint>(cookie) : 0;
}
|
额,然后调用到了AssetManager的addAssetPath 方法。
这个文件在AssetManager.cpp
1
2
3
4
5
6
7
8
9
10
11
12
13
14
15
16
17
18
19
20
21
22
23
24
25
26
27
28
29
30
31
32
33
34
35
36
37
38
39
40
41
42
43
44
45
46
47
| bool AssetManager::addAssetPath(
const String8& path, int32_t* cookie, bool appAsLib, bool isSystemAsset)
{
AutoMutex _l(mLock);
asset_path ap;
String8 realPath(path);
if (kAppZipName) {
realPath.appendPath(kAppZipName);
}
ap.type = ::getFileType(realPath.string());
if (ap.type == kFileTypeRegular) {
ap.path = realPath;
} else {
ap.path = path;
ap.type = ::getFileType(path.string());
return false;
}
}
for (size_t i=0; i<mAssetPaths.size(); i++) {
if (mAssetPaths[i].path == ap.path) {
if (cookie) {
*cookie = static_cast<int32_t>(i+1);
}
return true;
}
}
ap.isSystemAsset = isSystemAsset;
mAssetPaths.add(ap);
if (cookie) {
*cookie = static_cast<int32_t>(mAssetPaths.size());
}
#ifdef __ANDROID__
asset_path oap;
for (size_t idx = 0; mZipSet.getOverlay(ap.path, idx, &oap); idx++) {
oap.isSystemAsset = isSystemAsset;
mAssetPaths.add(oap);
}
#endif
if (mResources != NULL) {
appendPathToResTable(ap, appAsLib);
}
return true;
}
|
如果全局变量kAppZipName的值不等于NULL的话,那么它的值一般就是被设置为“classes.jar”,这时候就表示应用程序的资源文件是保存在参数path所描述的一个目录下的一个classes.jar文件中。全局变量kAppZipName的值一般被设置为NULL,并且参数path指向的是一个Apk文件。
AssetManager类的成员函数addAssetPath首先是要检查参数path指向的是一个文件或者目录,并且该文件或者目录存在,否则的话,它就会直接返回一个false值,而不会再继续往下处理了。
如果已经添加过了,那么AssetManager类的成员函数addAssetPath就不会再继续往下处理了。如果达到条件就会把路径添加到成员变量mAssetPaths所描述的一个Vector中去。
下面是Resources的创建过程。
1
2
3
4
5
6
7
8
9
10
| public Resources(AssetManager assets, DisplayMetrics metrics, Configuration config,
CompatibilityInfo compatInfo) {
mAssets = assets;
mMetrics.setToDefaults();
if (compatInfo != null) {
mCompatibilityInfo = compatInfo;
}
updateConfiguration(config, metrics);
assets.ensureStringBlocks();
}
|
Resources类的成员变量mConfiguration指向的是一个Configuration对象,用来描述设备当前的配置信息。
Resources类的成员函数updateConfiguration首先是根据参数config和metrics来更新设备的当前配置信息,例如,屏幕大小和密码、国家地区和语言、键盘配置情况等等,接着再调用成员变量mAssets所指向的一个Java层的AssetManager对象的成员函数setConfiguration来将这些配置信息设置到与之关联的C++层的AssetManager对象中去。
1
2
3
4
5
6
7
8
9
10
11
12
| final void makeStringBlocks(StringBlock[] seed) {
final int seedNum = (seed != null) ? seed.length : 0;
final int num = getStringBlockCount();
mStringBlocks = new StringBlock[num];
for (int i=0; i<num; i++) {
if (i < seedNum) {
mStringBlocks[i] = seed[i];
} else {
mStringBlocks[i] = new StringBlock(getNativeStringBlock(i), true);
}
}
}
|
AssetManager类的成员变量mStringBlocks指向的是一个StringBlock数组,其中,每一个StringBlock对象都是用来描述一个字符串资源池AssetManager类的成员变量mStringBlocks就是用来保存所有的资源表中的资源项值字符串资源池的。
如果资源还没读取出来,那么会先读取的。也会将系统资源表里面的资源项值字符串资源池也一起拷贝到成员变量mStringBlokcs所描述的一个数组中去。getStringBlockCount这个方法获取的资源数,含有系统资源表的个数sysNum的。
1
2
| if (i < seedNum) {
mStringBlocks[i] = seed[i];
|
这里如果有疑问的话,其实是这样的:
用来访问系统资源包的AssetManager对象就保存在AssetManager类的静态成员变量sSystem中,并且这个AssetManager对象是最先被创建以及初始化的。也就是说,当执行到这一步的时候,所有系统资源表的资源项值字符串资源池已经读取出来,它们就保存在AssetManager类的静态成员变量sSystem所描述的一个AssetManager对象的成员变量mStringBlocks中,因此,只将它们拷贝到当前正在处理的AssetManager对象的成员变量mStringBlokcs的前sysNum个位置上去就可以了。
这里,就分析完成Android应用程序资源管理器的创建的初始化过程了,主要就是创建和初始化AssetManager和Resources,其中,初始化操作包括设置AssetManager对象的资源文件路径以及设备配置信息等。
所以我们想要加载一个插件的资源,首先要确定是宿主和插件是不是需要共享资源,需要共享的话,可能只是调用AssetManager.addAssetPath(),把插件apk的地址传递进来,然后进行即可,但是这个方案的前提是已经解决 资源的冲突问题。
另外一种方案就是,插件使用一个全新的Resources对象。
1
2
3
4
5
6
7
8
9
10
11
12
13
14
15
16
17
18
19
20
21
22
23
24
25
26
27
28
29
30
31
32
33
| public class LoadResources {
public static class PluginResource {
public Resources resources;
public AssetManager assetManager;
public Resources.Theme theme;
}
public static PluginResource getPluginResources(String apkPath, Resources supResource, Resources.Theme supTheme) {
try {
PluginResource resource = new PluginResource();
AssetManager newAssetManager = AssetManager.class.newInstance();
Method addAssetPathMethod = newAssetManager.getClass().getDeclaredMethod("addAssetPath", String.class);
addAssetPathMethod.setAccessible(true);
addAssetPathMethod.invoke(newAssetManager, apkPath);
Method ensureStringBlocks = AssetManager.class.getDeclaredMethod("ensureStringBlocks");
ensureStringBlocks.setAccessible(true);
ensureStringBlocks.invoke(newAssetManager);
Resources newResource = new Resources(newAssetManager,
supResource.getDisplayMetrics(), supResource.getConfiguration());
Resources.Theme newTheme = newResource.newTheme();
newTheme.setTo(supTheme);
resource.assetManager = newAssetManager;
resource.resources = newResource;
resource.theme = newTheme;
return resource;
} catch (Exception e) {
}
return null;
}
}
|
然后复写Activity的三个对应的方法,在需要的时候返回想要的对象即可。
