前言 关于自定义属性,我们用的比较多的时候就是在自定义view的时候了,其实自定义属性还有一些其余的妙用。这里讲解一个利用自定义的属性为应用程序全局的替换背景的例子。
Android里面使用自定义属性的实例 可能我们在使用ToolBar的时候见过很多次的这种使用方式了。
1
2
3
4
5
6
7
<android.support.v7.widget.Toolbar xmlns:android="http://schemas.android.com/apk/res/android" xmlns:app="http://schemas.android.com/apk/res-auto" style="@style/ToolBarStyle" android:layout_width="match_parent" android:layout_height="?attr/actionBarSize" android:background="?attr/colorPrimary" />
在确定ToolBar的高度和背景色的时候,并没有在xml文件里面去写死,而是读取的Google自定义的属性值。
我们会好奇,这样怎么就能获取到值呢,这个属性是在哪里有定义的呢,关于怎么拿到值是另外一个问题了,现在来说一下这个值是在哪里定义的,并且在哪里赋的初始值的。
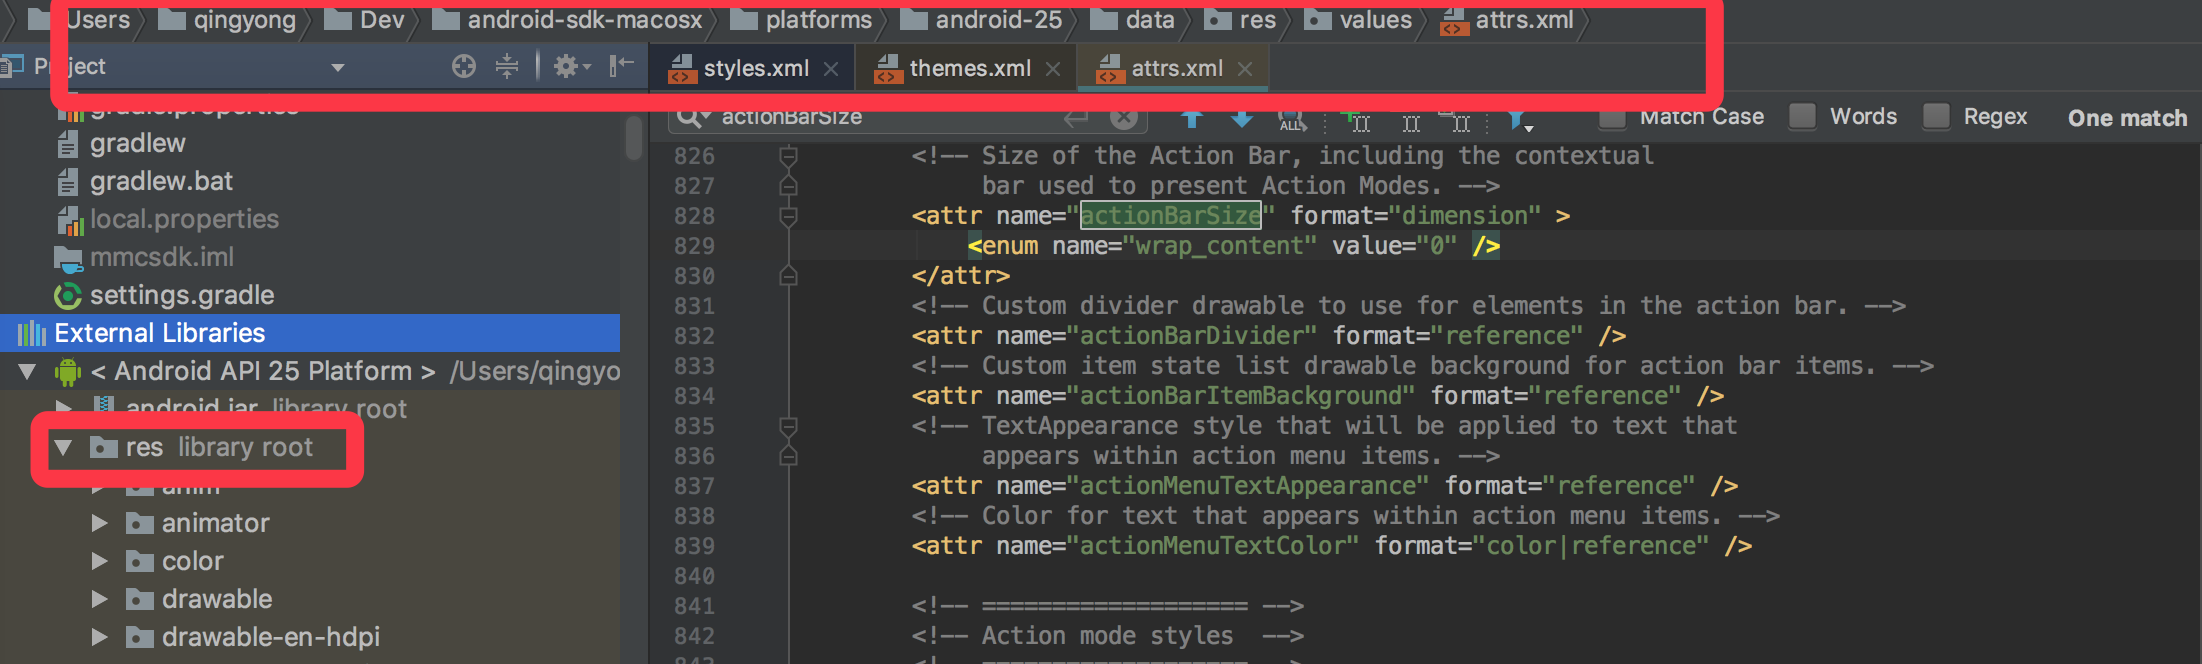
首先我们来找actionBarSize定义的地方,很明显这是一个系统的attr,那么我们直接去Android.jar的res/values/attrs里面去找即可。
1 2 3 4 5 6 7 <declare-styleable name ="Theme" > <attr name ="actionBarSize" format ="dimension" > <enum name ="wrap_content" value ="0" /> </attr > </declare-styleable >
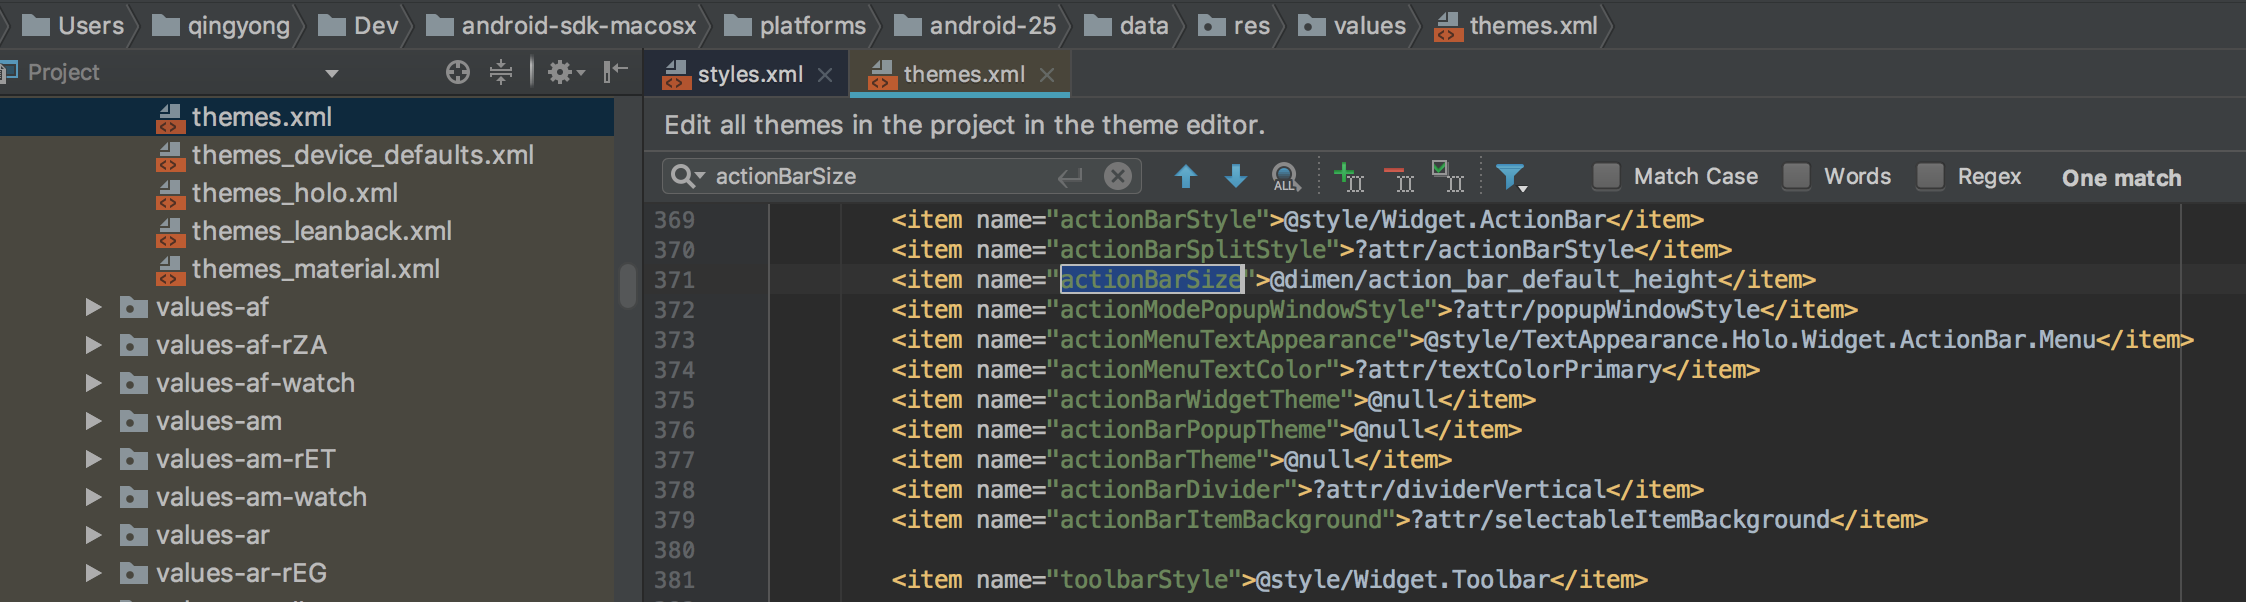
然后我们来找actionBarSize赋值的地方,一般这种东西赋值的地方都在当前项目的主题里面的,一般我们的应用的主题最终都会继承Theme这个默认的主题,那么我们直接去Android.jar的res/values/themes里面去找即可。
1 2 3 <style name ="Theme" > <item name ="actionBarSize" > @dimen/action_bar_default_height</item > </style >
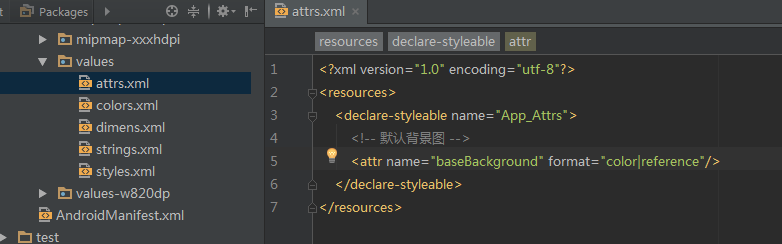
实战自定义属性 定义自定义的属性 在values里面新建attrs.xml文件,里面定义自定义属性。
1
2
3
4
5
6
7
<?xml version="1.0" encoding="utf-8"?> <resources > <declare-styleable name ="App_Attrs" > <attr name ="baseBackground" format ="color|reference" /> </declare-styleable > </resources >
给自定义的属性赋值 需要我们在当前程序的Theme里面对这个属性赋值。
1 2 3 4 5 6 7 8 9 <resources > <style name ="AppTheme" parent ="Theme.AppCompat.Light.DarkActionBar" > <item name ="baseBackground" > @android:color/holo_green_light</item > <item name ="colorPrimary" > @color/colorPrimary</item > <item name ="colorPrimaryDark" > @color/colorPrimaryDark</item > <item name ="colorAccent" > @color/colorAccent</item > </style > </resources >
赋值也完成了。
使用自定义的属性值 由于我们当前的程序的所有的界面都需要使用这样的背景色,那么我们可以定义一个自己的baseActivity,里面对setContentView作一个简单的处理。
创建base_layout的xml布局 base_layout.xml
1
2
3
4
5
6
7
8
<?xml version="1.0" encoding="utf-8"?> <FrameLayout android:id="@+id/base_layout_container" xmlns:android="http://schemas.android.com/apk/res/android" android:layout_width="match_parent" android:layout_height="match_parent" android:background="?attr/baseBackground"> </FrameLayout >
里面引用了自定义的属性值。
BaseActivity的代码 1 2 3 4 5 6 7 8 9 10 11 12 13 14 15 16 17 18 19 20 21 22 23 24 25 26 27 28 29 30 31 32 public class BaseActivity extends AppCompatActivity FrameLayout mBaseContainerView; @Override public void setContentView (@LayoutRes int layoutResID) setContentView(getLayoutInflater().inflate(layoutResID, null )); } @Override public void setContentView (View view) setContentView(view, new ViewGroup.LayoutParams(ViewGroup.LayoutParams.MATCH_PARENT, ViewGroup.LayoutParams.MATCH_PARENT)); } @Override public void setContentView (View view, ViewGroup.LayoutParams params) mBaseContainerView = (FrameLayout) getLayoutInflater().inflate(R.layout.base_layout, null ); Drawable bg = view.getBackground(); if (bg != null ) { if (Build.VERSION.SDK_INT >= Build.VERSION_CODES.JELLY_BEAN) { findViewById(R.id.base_layout_container).setBackground(bg); view.setBackground(null ); } else { findViewById(R.id.base_layout_container).setBackgroundDrawable(bg); view.setBackgroundDrawable(null ); } } FrameLayout.LayoutParams p = new FrameLayout.LayoutParams( FrameLayout.LayoutParams.MATCH_PARENT, FrameLayout.LayoutParams.MATCH_PARENT); mBaseContainerView.addView(view, p); super .setContentView(mBaseContainerView, params); } }
代码里面对setContentView方法作了简单的处理。
使用方法 1 2 3 4 5 6 7 8 public class MainActivity extends BaseActivity @Override protected void onCreate (Bundle savedInstanceState) super .onCreate(savedInstanceState); setContentView(R.layout.activity_main); } }
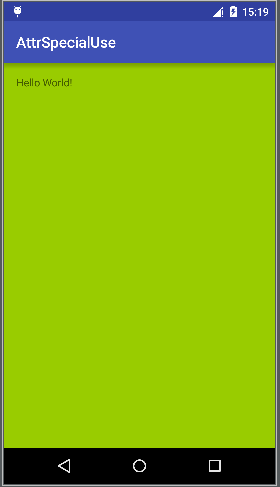
有图有真相: